This week’s challenge by Lorna was a crash course in Parameter Actions. And by crash course I mean this was the second week in a row I was bumbling around with my screen shared for others while I tried to figure out what the heck I was doing. Rather than peek at Lorna’s workbook this week (like I did last week on Ann’s challenge), I started scrolling through Lindsey Poulter’s Twitter feed knowing that I would surely find something that would be applicable. I found it in her Makeover Monday Matching Game. So everything in this post about how to accomplish the parameter actions I learned from Lindsey’s viz.
I started out just building the bars with the target lines to get warmed up. At first I just kind of plugged some numbers for the target to get set up until I had the parameters all figured out.
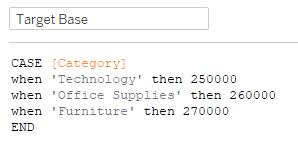
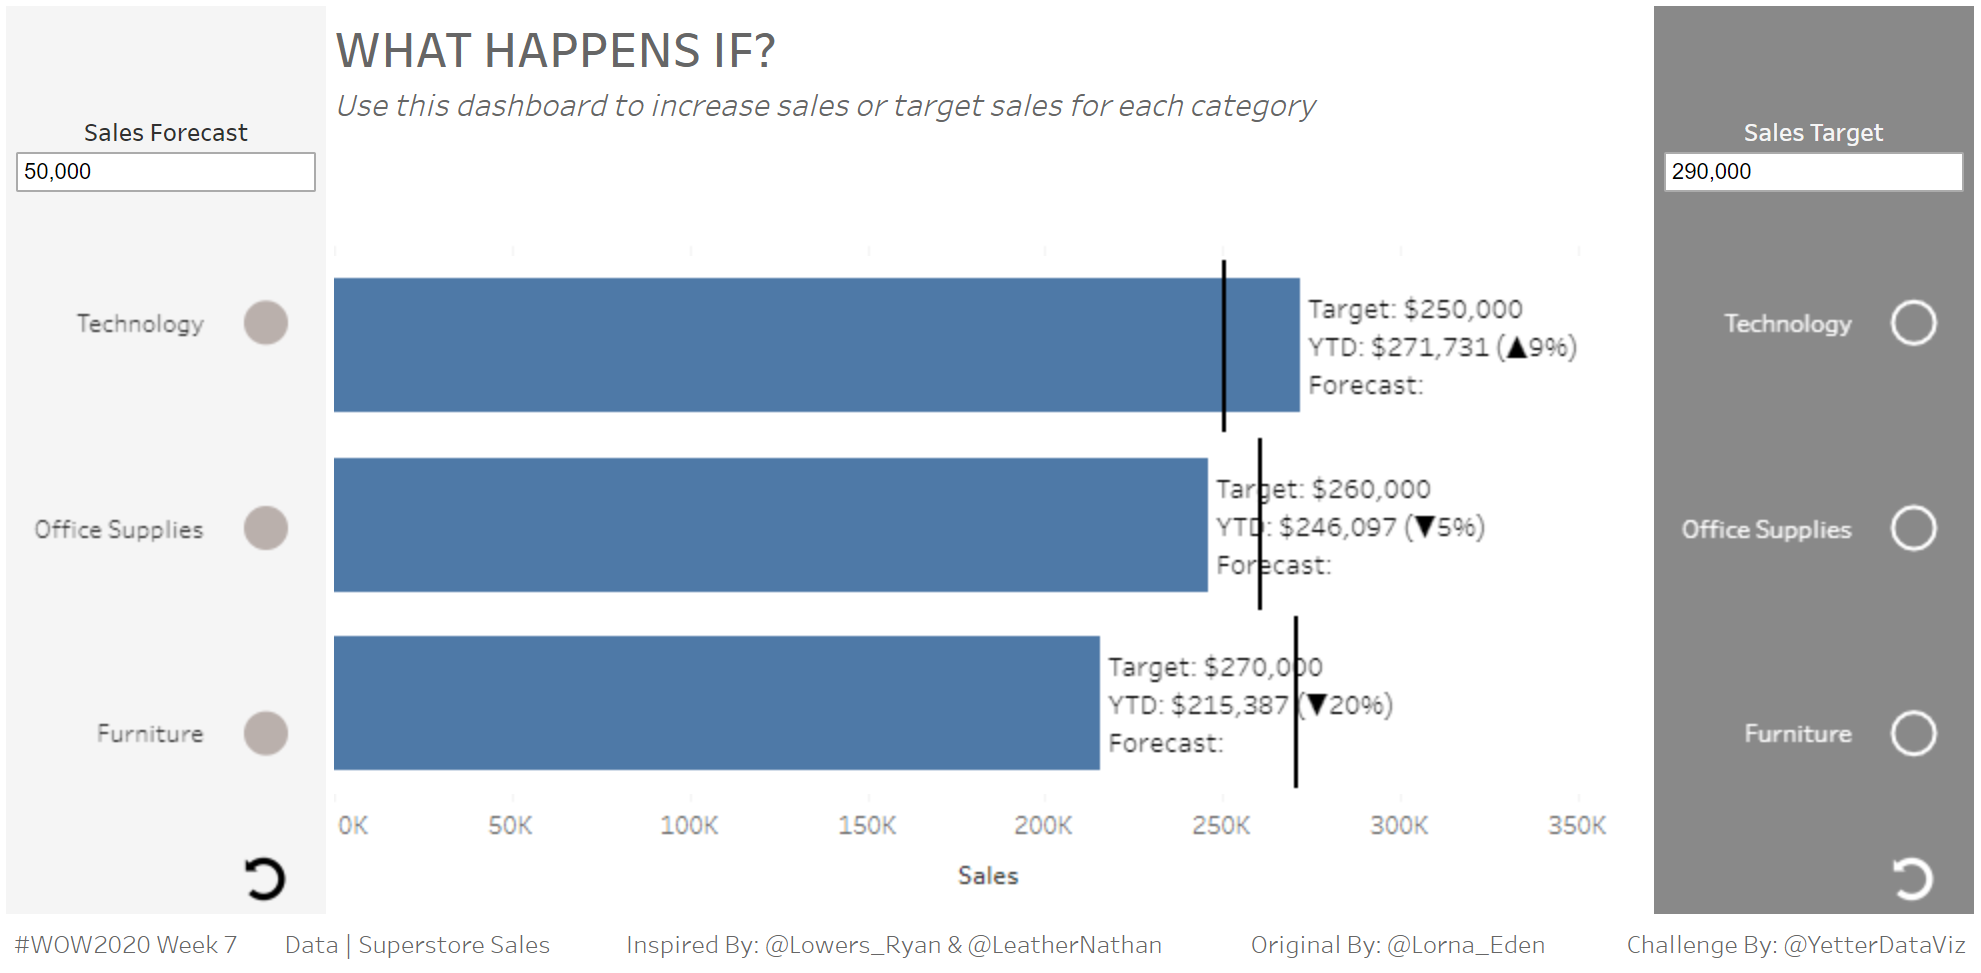
So in order to get the bars with the Gantt bars, I had SUM(Sales) and the Target value on dual axis, with Category on the rows.
With that base set, I built the Forecast and Target Labels. Once again, Category on rows for each, and then I just pulled category onto detail and changed the mark type to Circle for Forecast and Shape for Target (since they were empty/filled circles).
(Ok, I totally breezed through that…mostly because I’m afraid of how long it’s going to take me to go through the parameter actions, but also I feel like most of that is fairly self-explanatory, and I’ll get back to it more with the actions stuff)
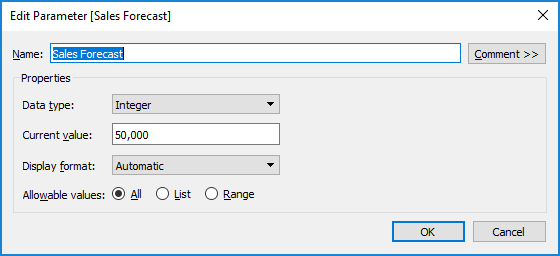
Parameters! First I created the Sales Forecast parameter:
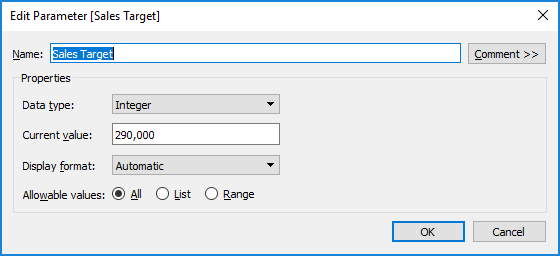
Then the Sales Target parameter:
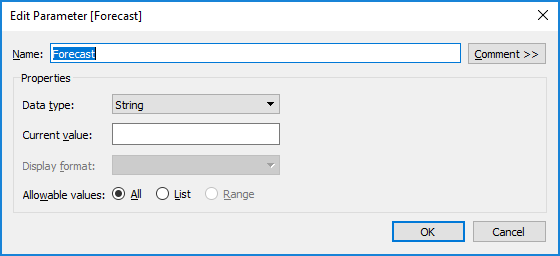
I decided, as I looked over Lorna’s viz, that I would need to build parameter values adding each category and value as the category was clicked on. Due to the nature of parameters, I knew I would need two, one for the category, and one for the value of the forecast/target. As I thought threw it, I figured they all needed to be strings, so I created four string parameters with an empty value (Forecast, Forecast Value, Target, Target Value):
On to Lindsey’s wizardry…(I’ll discuss Forecast, and Target is pretty much mirror image) In order to add values to a parameter as you click on things, you need a calculation to check if that value is already there, and if not, add it. Here’s what that calc looks like:

That one builds my Forecast parameter with the categories that have been selected. But per Lorna’s requirements, we also need to capture the amount typed in the forecast box when each category is selected. That requires a similar calc:

Notice that I’m starting with the [Forecast Value] parameter, checking if the [Forecast] parameter contains [Category], then adding the [Sales Forecast] parameter value (in string form) to the [Forecast Value] parameter.
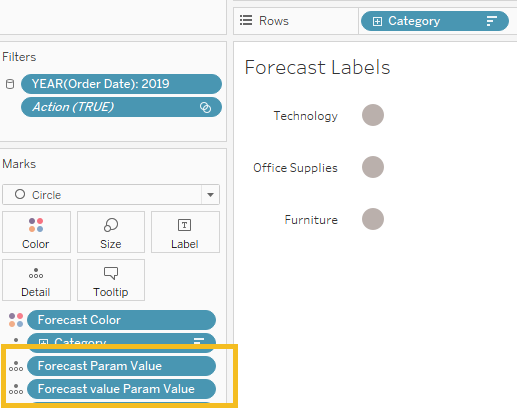
Now we need the Parameter Actions to pump this data in. In order to make it work, we need the above calculations in the detail of the Forecast Labels sheet:
Then on the dashboard, we add the action:
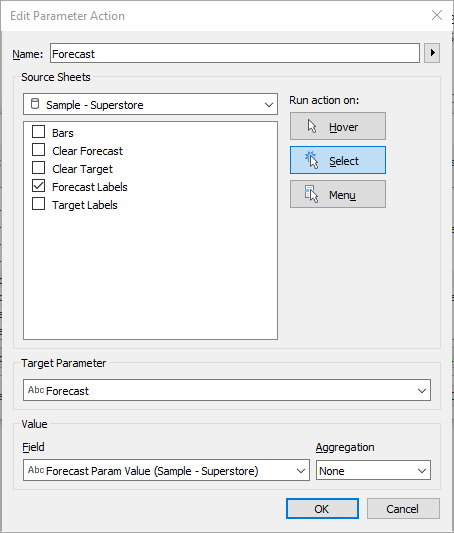
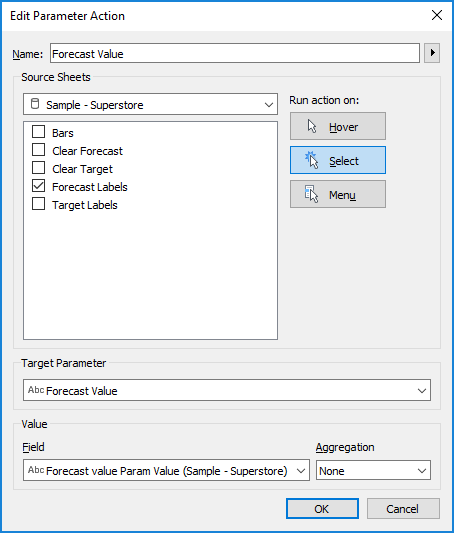
This says on Select in Forecast Labels, pass the [Forecast Param Value] into the [Forecast] parameter. The Forecast Value action is similar:
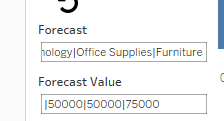
At this point I chose to show the parameter control for Forecast and Forecast Value so I could see what was happening. And it worked!
Now that we’re capturing these values, we have to turn them into the thin bars on the bar chart. But how do we tie the category in [Forecast] to the value in [Forecast Value]? I started by identifying the 1st, 2nd, and 3rd values of each parameter, like this:
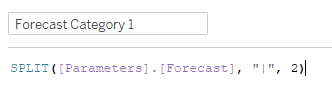
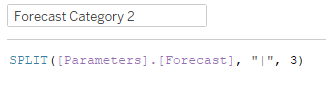
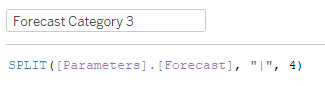 (Forecast Value 1,2,& 3 were similar, just with INT in front of the SPLIT in order to turn them into numbers)
With each of the values split out, I can now create the forecast value based on Category:
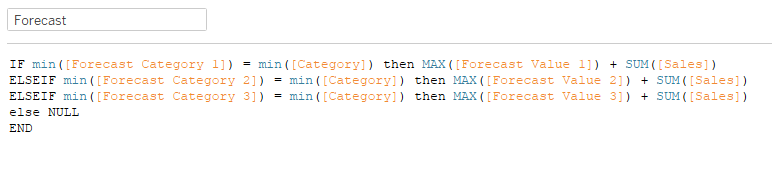
Basically, I’m checking to see if the [Category] is in [Forecast Category 1], and if it is, add the [Forecast Value 1] to SUM[Sales]. (I’m adding to SUM[Sales] because that’s what the forecast is doing per Lorna’s requirements) Same thing for the 2nd and 3rd calcs. If the [Category] isn’t in any of the 3, then NULL so the bar doesn’t show up. Drag the [Forecast] onto the SUM(Sales) axis in the bar chart, and move [Measure Names] to Color and Size, making sure to turn Stack Marks “Off” in the Analysis menu. Another round of testing showed appearing bars!
Along the way I needed to build the clearing mechanism. So I created a Clear Forecast and Clear Target worksheet, with a [Clear] calc consisting of “” (yep, just two quotes). With [Clear] in the detail, I chose the Shape mark, then added an Undo icon for the Shape.
(SIDENOTE: Need icons? I usually do a Google search, but then you have to figure out if you need to attribute or what, and is it transparent, etc. I realized I could just open up PowerPoint, pick the icon, make one black and one white (since the Target version needed to be white), and save it as a PNG. Then you save them into the Shapes folder of My Tableau Repository, and you’re all set!)
After adding that sheet to the dashboard, I created another Parameter Action:
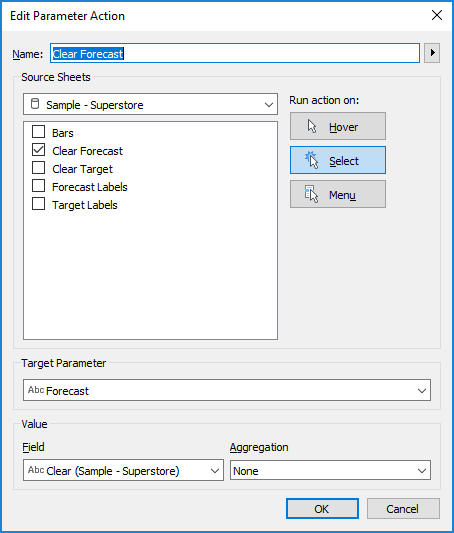
So this will just pass “” into the [Forecast] parameter, making it start fresh.
One of the extra items in the challenge was to make selections automatically deselect. I’ve talked about that here before, using Yuri Fal‘s TRUE/FALSE method. I applied this to Forecast Labels, Target Labels, Clear Forecast, and Clear Target.
For the bar labels, I created a [vs Target] calc:

Then to get the up/down triangles to show, I remembered a formatting trick I think I first learned from Curtis Harris. If you set your regular number format, you can then select Custom and tell Tableau what you want to show for positive, negative, or zero values.
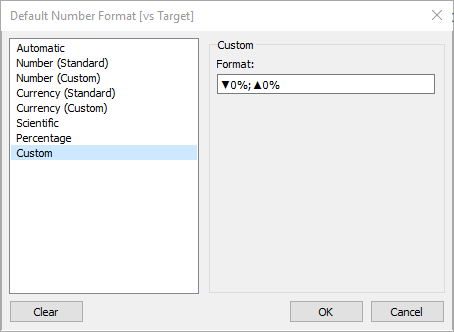
In this case, my positive number is down, because those are my values less than 100% since I did 1-(sales/target). If you want another format for a zero value, you would just add another semi-colon and then the value you want.
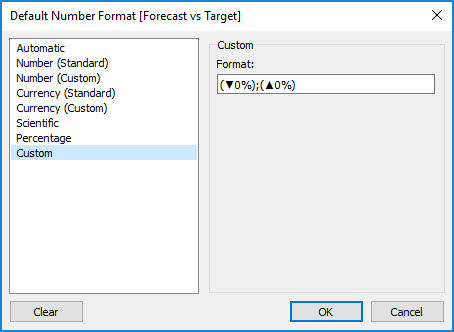
This worked fine for my sales vs target, since it was always appearing. But when I did the same for my forecast vs target, I realized I could just hardcode the parentheses in the label, or it would just look like this () if there wasn’t a forecast. So I decided to throw the parentheses in this custom format, and it worked!
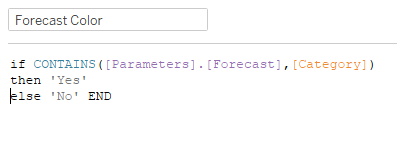
At this point, I did all the same Parameter Action work on the Target side, and created a calc for the Forecast Color (with a similar one for Target Color):
After adding those to the Forecast Labels and Target Labels sheets, I checked the tooltips, got everything sized, padded, and colored correctly in the dashboard, and tested like crazy (seriously, I think I clicked around those circles at least a hundred times). With that, we did it!
Here’s the link to Tableau Public
Once again, a shoutout to Lindsey Poulter whose work I reverse engineered to get to this point. Great challenge Lorna!