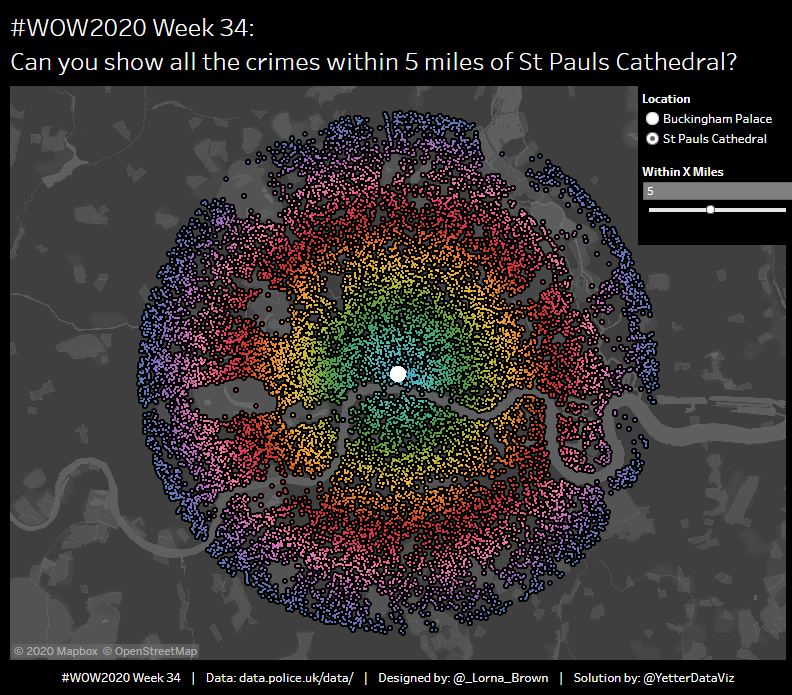
This week’s challenge from Lorna changed it up a bit with some mapping stuff. I don’t get much of a chance to use mapping at work, so it was kind of fun to play with something new. Since I haven’t used the functionality much, I used a couple posts from Jeff Shaffer and Sean Miller that helped a bunch to figure out the radius setup.
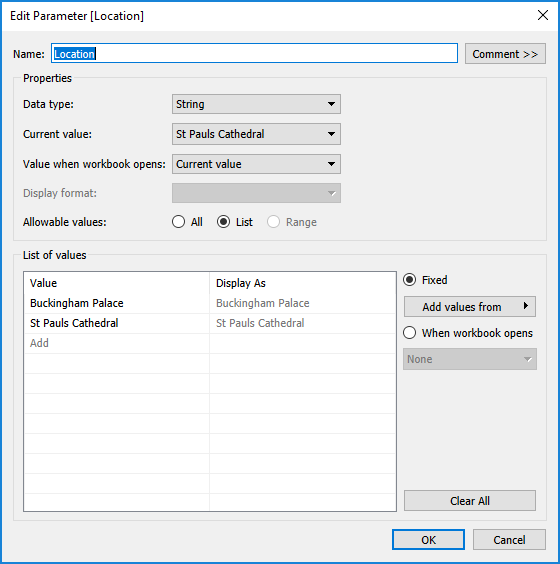
I started with a parameter for the location selector for Buckingham Palace or St Paul’s Cathedral:
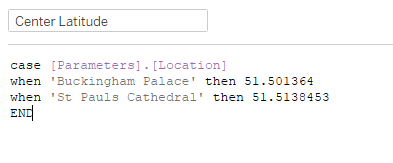
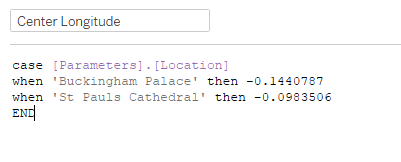
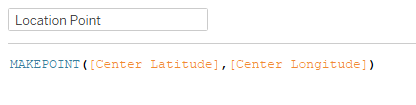
Then I created a couple calculations to set Latitude and Longitude for the center point based on the parameter selection:
Last step is use MAKEPOINT to create a point for the center location:
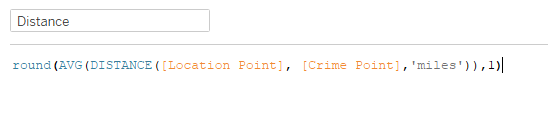
With both points, I can now measure the distance from the chosen point to the crime point:
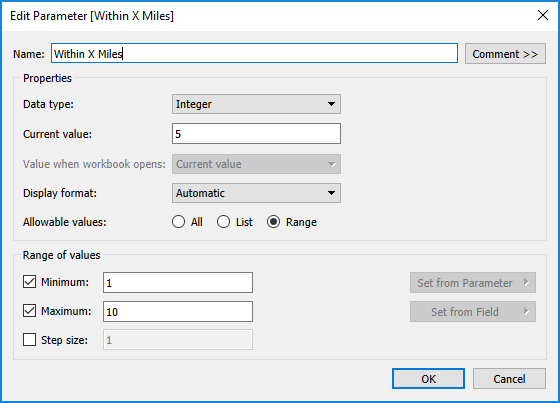
Next I created a parameter for the number of miles radius:
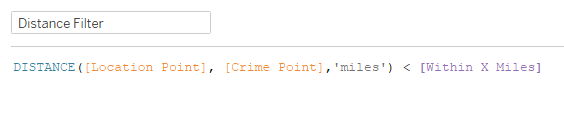
With that, I can create a boolean to filter the items to only within the radius:
Now we can put the map together. Double-click on Latitude (generated) and Longitude (generated), and that inserts them on Rows and Columns. In order to get each dot, we add Crime ID and Crime Point to detail. I also added Distance to Color. Initially, when it was continuous, I couldn’t get the Hue Circle color scheme. So I tried changing it to Discrete, and selected Hue Circle palette, and Assigned palette. That matched up with what Lorna’s looked like. I wasn’t quite sure what her note about color bands in 10 meters meant, as I was unable to create bins or anything from the Distance field.
In order to get the larger dot, we need a dual axis. Ctrl+click on Latitude(generated) and drag it next to the original. Then right click and select Dual Axis. Then on this second Marks card, you replace Crime Point with Location Point. Remove Distance from Color, and set it to White. Then you can increase the size.
Last thing we need for the map is to adjust the map settings. From the Map menu, click on Map Layers. Set Style to Dark, and then I set Washout to 25%:

Now on to the Tooltip. Add Month to Columns, and COUNTD(CrimeID) to Rows. Make sure the Distance Filter is applied to this sheet as well.
Back on the Maps sheet, we need to add COUNTD(CrimeID) to Tooltip, and then setup the tooltip:

The important thing when adding the Tooltip sheet is to make sure it only filters on LSOA name.
On the dashboard, we pull in a Vertical container, and add the Map to it. For the title, we need to include the two parameters:

We can then add the two parameters to a floating Vertical container, and place them in the top right of the view. And we’re done!