I’m not sure if it’s that I was trying to move quickly (since we started doing #WorkoutWednesday live at work with a few colleagues so they can see some of the methods to make things work in Tableau) or what, but Ann’s challenge this week had me flustered for a bit. By the end, I realized I could’ve done it like Ann in only two sheets, but the path I started down (and was too lazy to get off of and start over) used a few more sheets. Thankfully, “# of sheets, up to you” was the second item in the requirements!
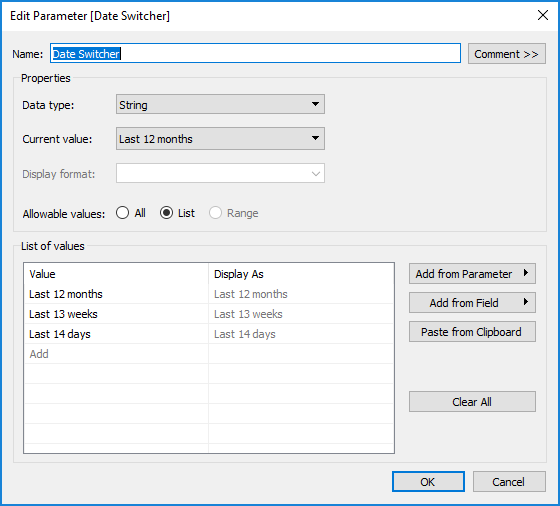
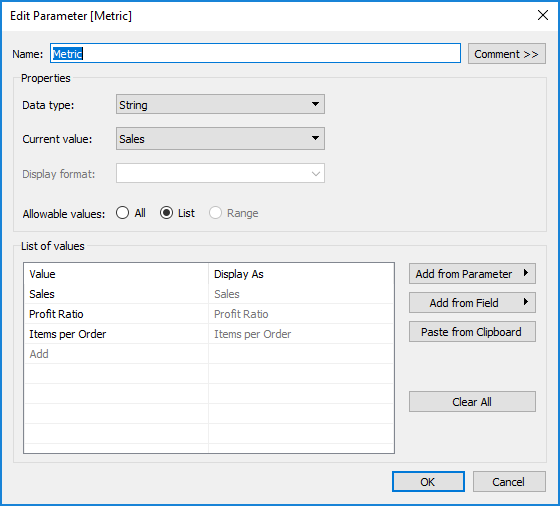
Ok, so I started with building two parameters. One for the Metric, and one for the date range. These were just basic string parameters with 3-item lists.
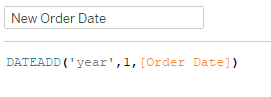
Once I had the parameters set up, I started working on the dates. Oddly, Ann’s data went through 2019, but mine only went through 2018. So I made a quick calc to add a year to the Order Date:
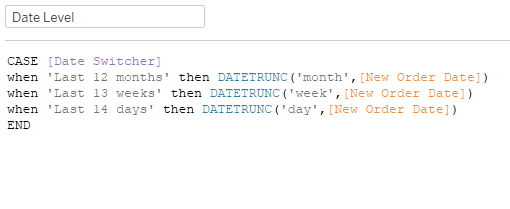
Then I created a calc to dynamically set the date level based on the parameter:
I also created a calc that filters the date to the desired duration:

When I first added Date Level to the view, I set it as a Continuous Date. So then I realized I would have trouble adjusting the formatting of the axis, so I decided to make a sheet for each parameter option (Daily, Weekly, Monthly) and just switch which sheet was shown on the dashboard by the parameter. I needed one more calc that just brought the value of the parameter in to filter the sheets.
(*Sidenote: I realized as I went forward that I didn’t want the date to be continuous, it needed to be discrete. This is the thing where I was so far down the path, I didn’t want to bother changing everything. With a discrete date dimension, I could’ve just made them strings, formatted in the manner we needed them to be in. That’s the way Ann did it.)
For the metrics, I used a similar case/when calc:
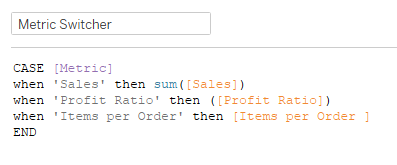
[Items per Order] was just SUM([Quantity])/COUNTD([Order ID]). This case statement adjusts the measure based upon which parameter option is selected. I added another calc that passes through the parameter value in order to set the colors. I formatted the date axis in each of my sheets as follows: Monthly – mmm ‘yy, Weekly – \Week ww, Daily – mm/dd. The week was a hard one because when I typed the W for Week it put the week number in it. So I picked one of the formats that showed weeks, and saw that there was a backslash in front of the w that showed as text. Plugged it in, and it worked!
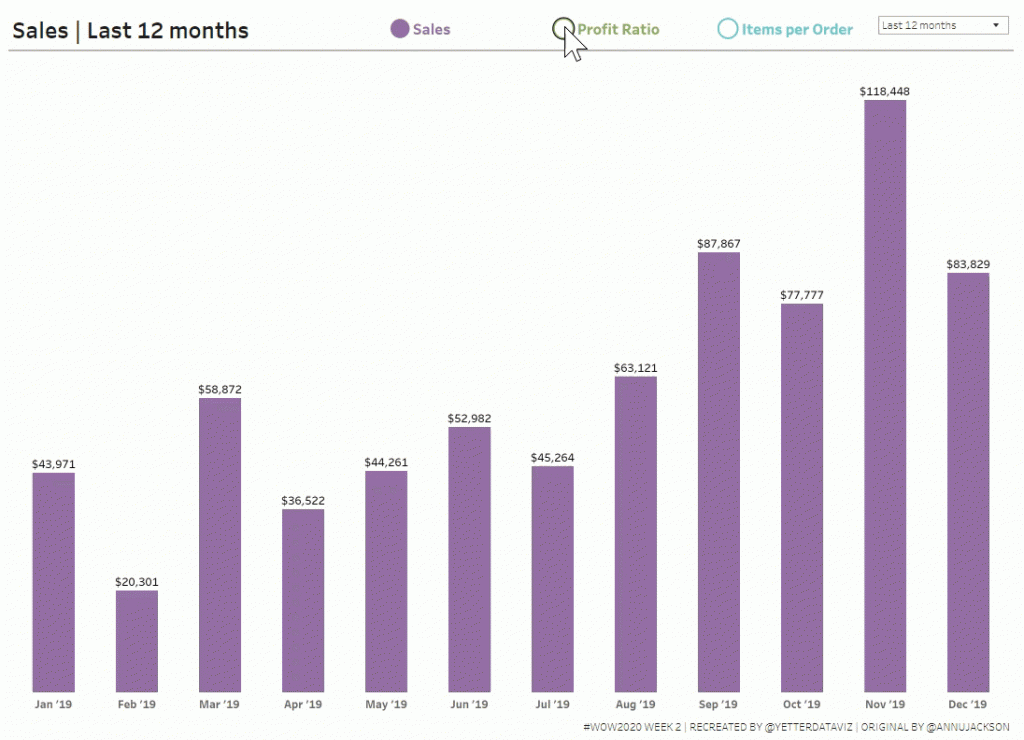
I skipped the labels at this point and just pulled my Daily/Weekly/Monthly sheets into a dashboard to feel like I was making progress. The key to sheet switching is to bring all three (or however many) sheets into a horizontal container, hide the titles, and set the sheet filter for each. For example, with the Date Switcher set to Last 12 Months, I added the Date Switcher Filter (which is just the parameter value), checked Last 12 Months, and that’s it. Then you change the parameter to weeks, set the filter on that sheet to Last 13 weeks, and so on for the Last 14 days. Now each sheet only appears when that respective parameter has been selected. And when there is no data in a sheet within a horizontal (or vertical) container, it minimizes to a couple pixels wide.
Now for the legend. I tried quite a few things trying to figure out how to get the shapes so neatly aligned with the text. I knew I needed to use shapes, with an open circle when the item wasn’t selected and a filled circle when it was. I tried to figure out how to get them all in one sheet, and eventually just bailed for the three sheets version, one for each metric. So I created three boolean calcs, one for each metric, that just had [Metric] = ‘Sales’ (or Profit Ratio or Items per Order…for this description, I’ll use Sales; the other two used the same process). I dragged that onto shape, and had to switch the parameter to set both True and False values. Then I double-clicked in the Marks card and added ‘Sales’ for the label and also the color. I aligned the label to the right, and the alignment was still kind of funky. I tried adding MIN(0) to the columns, and that made the text align really well with the circle. However, when I put them all together on the dashboard, there was too much extra space to the left of each one. Then I remembered something I watched Luke do in his solution video for week 1. If you make it MIN(0.0) instead of just MIN(0), you can set the axis at a decimal level. So I played with the axis a bit, and setting the low end to -0.1 and the high end at 0.5 worked like a charm.
With the legends in place, it was time to add the parameter actions. Amazingly, this was almost the easiest part (especially after struggling through the legend stuff for about 30 minutes). Here’s what that looked like:
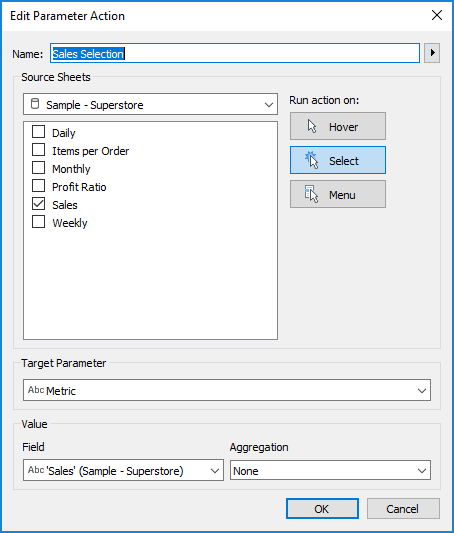
This worked because what I typed in the marks card matched exactly what the parameter values were, so I could use that as the Field in this case.
Another thing I saw Luke do in that video was automatically deselect when an item is clicked on for a parameter action. Compared to the workarounds I’ve done in the past (Joshua Milligan’s technique is the one I’ve used the most), this one is super simple. (I believe it can be attributed to this tweet from Yuri Fal) Create a calc named TRUE, with calc TRUE. Then create a calc named FALSE, with FALSE. Add both of these fields to the detail (in this case, I added them to the three legend sheets). Then create a Dashboard Filter action like this:

And you magically have items that deselect the moment after you select them, so you get the magic of the parameter action without the lack of magic of having to click twice on the next one you want to change (or having highlighting that you don’t want).
Now the only thing left was the labels. I cringed a little when Ann’s requirements said to use REGEX for the number formatting. While I’m aware of what REGEX is, I have very little experience with it. But I decided that this is why I do Workout Wednesday, so I started searching. I found a great regex cheat sheet posted by Ken Black here. This didn’t really help me solve the problem, but it helped me make a little more sense of the solution once I found it, and thought it was a great resource to share. Then I found this gem in the forums that was doing almost exactly what I needed to do:

Here’s where I ended up on my label calc:

I don’t have much explanation of the REGEX…total copy/paste aside from rounding the value. I had to round the profit ratio twice in order to get the three decimal places of the original value for the two digits + one decimal place of the final desired value.
Quick touchups on the tooltips and checking all the formatting, and we made it to a solution!
To view in Tableau Public, click here. Thanks for following along!